Authenticating Targets (CHAP)
The ISP4010 firmware uses the challenge handshake authentication protocol (CHAP) as an authentication mechanism between the iSCSI initiators (QLA4xxx HBA ports) and the devices to which they are attached (targets). Authentication can be disabled or enabled for a specific target or for all targets attached to the QLA4xxx HBA port.
NOTE: The targets attached to the QLA4xxx HBA must be programmed for or support CHAP.
Perform the following steps to set up CHAP for the QLA4xxx HBA port and the attached targets:
- In the SANsurfer iSCSI HBA Manager main window HBA tree, select the HBA port. Click the Target Settings tab, and then click Config Authentication.
- The Security Check dialog box displays. In the Enter Password box, type the password. Click OK.
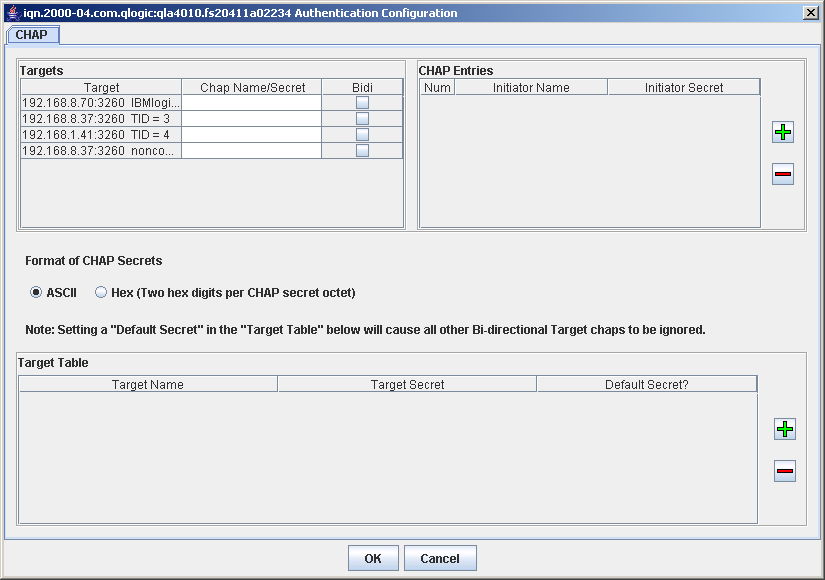
- The Authentication Configuration dialog box (CHAP tabbed page) displays (see the illustration below).
Authentication Configuration Dialog Box (CHAP Tabbed Page)
The dialog box contains three sections:
- Targets
- CHAP Entries
- Target Table
- To enable an initiator name and initiator secret, do the following:
- Add a Chap entry in the Chap Entries table.
- In the Targets table assign desired Chap entry (Name/secret pair).
- Once target data is saved this chap entry assignment will be active.
- If you also want the QLA4xxx HBA (initiator) to authenticate the target, perform these additional following steps:
- Add a Target Table chap entry.
- In the Target table select the Bidi check box of the target you want to authenticate.
- Once target data is saved this chap entry assignment will be active.
To enter hex secrets:
- Click Hex (Two hex digits per CHAP secret octet).
- Enter the desired secrets in the CHAP table or Target table.
- Enter the two digit hex character code for each hex digit to be part of the hex secret.
NOTE: Toggling between hex and ASCII automatically converts the hex representation to its ASCII equivalent, if one exists, and chap secrets in ASCII are automatically converted to hex equivalent.
To enable one default secret for bi-directional target authentication:
- In the Target Table click the check box corresponding to the Target Name and Secret to set it as the default.